Sunday 11 December 2016

I'm Board....Chairman of the Board

We're making good progress now.  A bit of time off work has meant that I can press on and spend whole days working on the project rather than trying to fit it in around family, work and leisure.


With the insulation complete, bearers fitted, the whole room wrapped in the vapour control barrier and all joints taped shut with aluminium tape it was time to start fitting the plasterboard sheets.

Fitting the boards on the sloped ceiling was a bit tricky, but by fitting some temporary bearers and supports I was able to lift the sheets into place myself and then screw them into their final position.


Each of the Velux windows had to have plasterboard fitted to each side, top and bottom so that the ingos could be plastered and painted to match the ceiling.  The top ingo extends out horizontally whilst the bottom ingo extends down vertically.  As well as improving the aesthetics this also allows more light into the room.  

The plastering of the curve was well beyond my capabilities, so once again the 'Day It Yersel' ethos was binned in favour of getting the professionals in.  We managed to squeeze a small alloy tower into the stairwell to make it easier to plaster.

The professionals in question are Paul Skilling (Senior) Plasterers - 07974 805 688, but there's absolutely no question over their work.  The first coat of plaster is a bonding coat and once that has dried the finishing coat of plaster will be applied.

Once the sloped ceiling was plasterboarded the walls were done, with the electrical cables pulled through and the socket boxes fitted.

So there we have it, plasterboarding all finished and the first coat of plaster applied to the inside of the stairwell.

Sunday 16 October 2016

(W)rappers Delight

With the insulation finished, it's nearly time to start sheeting the walls and ceilings with plasterboard.  However, before that we need to fit some timber bearers to screw the plasterboard onto and then wrap the room with a vapour control layer.

I had 1/2" sheets of sterling board ripped into 3" wide strips and i then screwed through the these and the insulation into the roof trusses with 120mm x No.12 screws.  These provide a good solid fixing and the plasterboard will be screwed onto these strips.

With the timber bearers in place the vapour control layer (VCL) could now be fitted by stapling to the timber.  Without a VCL warm, moisture filled, air would pass through to the cooler outer layer of insulation where it would condense. The increased level of moisture in the timber from the condensation could create the conditions for Serpula lacrymans (dry rot) to take hold and we certainly don't want that in the future!

Once the external facing walls of the room are fully wrapped in the VCL all the joints will be taped over with aluminum tape to create an airtight barrier.  Then the plasterboard will be fitted.

Whoa, We're Hawfway There.....Whoa-oah, Laying Doon a Flair.

We're a wee bit more than halfway, but with the floor laid it's now starting to look like a room.

With the insulation finished (apart from one wee square where my temporary socket is) and the electrician having completed his first fix (running all the cable behind walls and under floors), the floor could be laid.

For easiness and price, we used 22mm thick tongue and groove chipboard.  The edges are glued together and the boards are then screwed into the joists to secure them in place.

These sheets are cheaper than traditional timber flooring and are quicker to fit.  The boards are also moisture resistant and are a decent replacement for traditional flooring where a carpet or other covering is going to be fitted.

and there we have it, one floor laid. 

Friday 16 September 2016

The Bends


It's been a wee while since i've updated the blog, but that doesn't mean that there hasn't been anything happening.............OK, actually that's exactly what it means.  Summer holidays, laziness, cycling and lots more excuses, but in the end i got round to finishing the circular partition.  

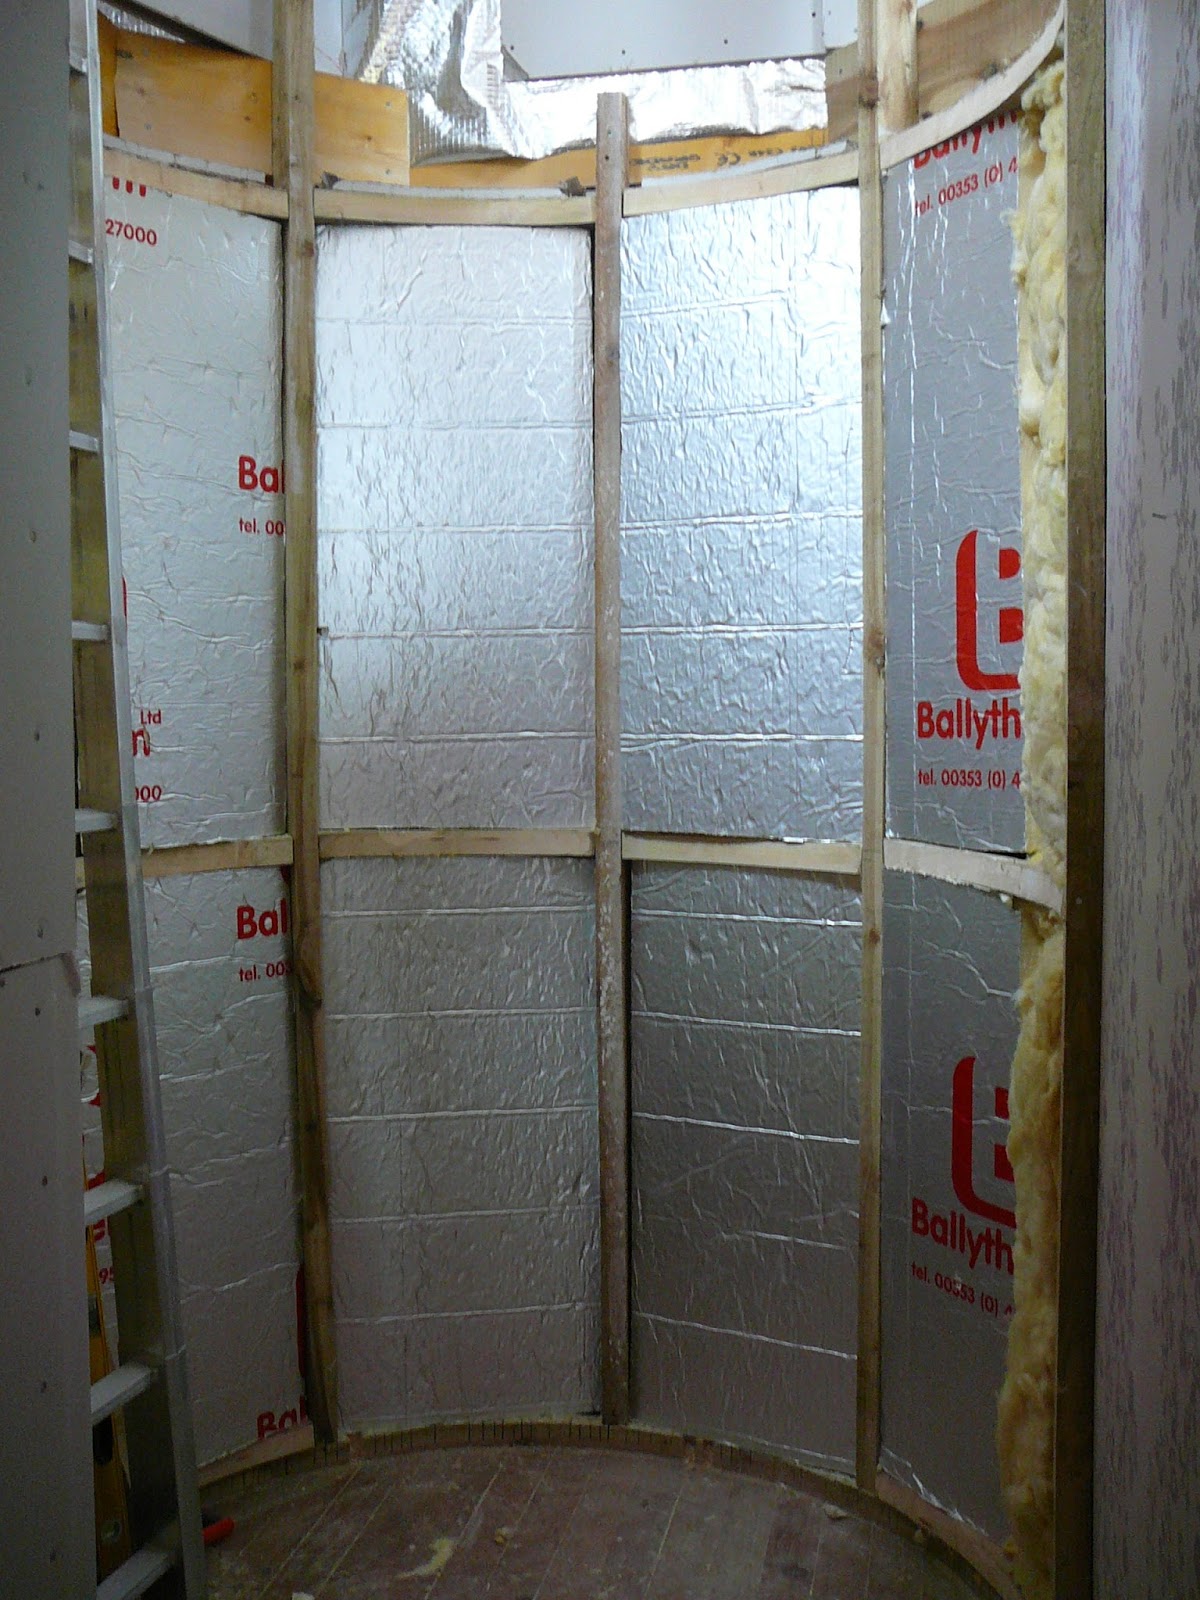
The infills of the partitions where filled with the 90mm Ballytherm insulation boards.  The gaps created between the curve and the original square wall were filled with insulation quilt to provide an acoustic barrier and reduce any echoing of noise between the rooms and floors.

Once the insulation was fitted it was time to fit the plasterboard to the inside of the curve.  I tried a few methods, including leaving the boards to bend over time and soaking the boards, but after snapping a few boards i decided just to slice down the back side of the boards every 6 inches and bend-curve them into place.

Slicing the boards meant that it wasn't a perfect curve that was created, instead looking more like a series of 6 inch wide strips fitted round the curve.  However, the plasterer will be able to smooth this out when he's plastering the full coat of plaster.

Eventually i reached the top, staggering the joints as i worked my way up and screwing the boards in place.

There we have it, a fully insulated and lined curved partition.  Quite chuffed with my efforts here (even if it did take me months rather than weeks).


Saturday 4 June 2016

All the right curves in all the right places

As we're planning on fitting a spiral staircase we wanted to create a curved stairwell to match.  The stairwell would need to extend up into the loft space to give the best effect  I'd never made a partition with a curve before never mind a 270 degree through floor partition!

The square opening had previously been formed as part of the joist works in the loft space, so the circular 360 degree opening was simply marked out within this square then roughly cut out.  The curved bottom rail of the partition was formed and the uprights were fitted in place, extending up into the loft by 1.2m.


The curved base rail was formed by cutting a series of 25mm deep notches at 12mm intervals in 50mm x 50mm timber.  The 50mm x 50mm timber was doubled up to meet the required 100mm x 50mm partition thickness set out by the structural engineer in the drawings.  The uprights are 100mm x 50mm timber.


Cutting the notches was very, very time consuming and i worked out later that i'd cut approximately 400 notches and that didn't include a couple of early attempts that cracked and split due to the notches not being deep enough or frequent enough. 


The dwangs also had to be curved, but because these were relatively short pieces of timber it was easier to mark the curvature required and cut the curve using a jigsaw. 


Quite chuffed with the finished partition.  Hopefully curving and fitting the plasterboard will be a relatively straightforward task.  Fingers crossed!


Sunday 22 May 2016

Tear down the wall

It's time to cause a bit of disruption downstairs!

As part of the loft conversion the 1st floor bedrooms are to be reconfigured, with part of 1 bedroom becoming the staircase up into the loft and the remainder of that bedroom being knocked together with the small boxroom to create a large bedroom (7m x 2.5m)

To try keep inconvenience and mess to a minimum i took the wall down by stripping each component off pretty much in the order it was originally constructed.  

The original plasterboard was 25mm thick with a heavy 12mm plaster coat on it.  

By stripping out the dwangs and upright 4" x 2" studs of the partition from one side i was able to leave the other side intact until it was time to break through.


Wednesday 13 April 2016

Hanging by a thread

The 2nd and 3rd Velux windows are now fitted.  Hurrah!

Fitting the 2 larger Veluxes was essentially the same process as the 1st smaller Velux.  However, i didn't have the luxury of having an existing opening (skylight) to work from, which meant that i had to go out onto the roof to strip back the slates.

The roof is quite steep, not quite as steep as this photo suggests, but steep enough that it was impossible to sit on without sliding down it.  So, as well as wearing a full body harness with a fall arresting inertia reel, i had to use a rope in which i tied foot loops.  So, whilst sort of sitting-laying on the roof with the sole of my foot in the loop i started stripping the slates where the Velux was to be fitted.


Once enough slates had been stripped i was able to cut through the sarking boards and felt to form an opening large enough for me to fit through.  This meant that i could strip the rest of the slates and form the full opening from the relative safety of the loft.  Forming the full opening was covered in my previous post, so no need to bore you with that again.

As before, the sash was removed and the frame was fitted into the opening with a 20mm clearance all round as per the instructions.


The Velux is secured in place by these large brackets which are screwed onto the frame before fitting then screwed through the sarking into the doubled up rafters.


Felt is fitted up against the frame and i have also sealed this onto the frame using roof sealant.  This isn't strictly necessary, but i wanted to reduce the risk of leaks at the rear elevation windows in particular as it's less sheltered than the front and exposed to high winds and driving rain.


The flashing kit is has to be ordered over and above the main Velux window and it's an extra £60, but it's well worth it as each part fits accurately, providing a good weathproof seal.  The kit comes in 4 main parts, top, bottom and two sides.  The top and bottom flashings are large single piece, shaped metal sheets which are fitted to the Velux frame and then slated over, with the bottom flashing creating a 6 inch apron for weathproofing.  The side kits come in 7 pieces per side and each one overlaps the other with the 'tangs' folded down to hold it in place.  A capping piece is then fitted up the edge of the frame and this capping piece covers the upstand edge of the flashing pieces.


There appears to be two ways to fit the flashings, one is the way i've done it and the other is to overlap each individual side flashing with a slate.  i.e. alternate flashing, slate, flashing, slate.  I preferred to fit the flashing as one piece before slating it in as i believe this gives a better seal to the roof felt and reduces the chance of wind driven leaks. The slates on the rear elevation of the roof are easily twice the thickness of modern slates and overlapping them with the individual flashing pieces would have meant they would have sat higher than the edge, which would have made fitting the capping piece almost impossible.


And here are the two rear Veluxes fitted and slated in place.  So far there's been a few good days of heavy rain and no leaks, so it looks like the job's been done well.


I'll be back out on the roof in a while to fit the slate vents, so i'll be keeping my harness, inertia reel and rope handy, because falling 30 feet might sting a bit and may leave a nasty bruise!