The units that I had previously assembled were sat into position then levelled and squared up as required. The handy clamps are great for holding units together whist they are bolted together (cheers James)
The sink was a 'two man job' and had to be fitted in place before the worktops, which meant protecting it and a bit of careful working was required.
You can see the wiring for the new sockets in this pic and if you look carefully you can see the pull out corner accessory which allows us to make full use of the previous 'dead space.' The new wall units are 920mm high, giving an overall height of 2.4m from floor to ceiling, which increases the storage space considerably.
The under unit LED strip lights are also from IKEA and are the same type as the ones we fitted behind the cornice in the living room.
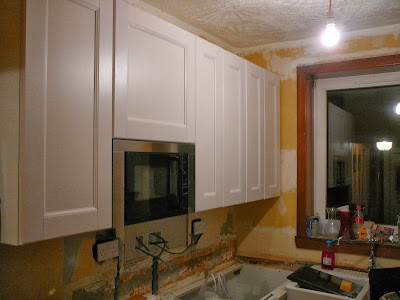
Doors fitted to the wall units and eye level microwave in place. Still a bit of work to do, but it's starting to look like a kitchen now.
Double oven fitted in a high level larder unit. This saves anyone having to bend over in the limited space to try get things out of a floor standing oven. As with the left-hand corner you can see the pull out corner accessory which allows us to make full use of the previous 'dead space.'
We chose a double sized Belfast style sink to create a central feature in the narrow kitchen. The corner pull-out accessories swing round then slide fully out, providing full access to the storage in the corner space.
I have to say that i'm very impressed with the quality of the IKEA kitchen components for the price (e.g. solid wood framed doors, metal framed drawers with 15mm drawer bases and ball bearing drawer runners) and how easy the units and components were to assemble. The appliances were also very good value for money (particularly with 25% off) with a good range of features on the oven and microwave.
I suppose time will tell how good the quality and VFM really is.
The kitchen installation is finished (in time for Christmas), but we've still to do the tiling and a wee it of painting and decorating. Pictures of the fully finished article will be published in the new year.
Have a happy Xmas and New Year and thanks for reading my blog.


